It is one of the most recognizable delicacies in several Indian cuisines. It
has a guaranteed place on menus in Indian restaurants all over the world. And
yet, it is one of the most poorly understood Indian dishes .
And also the most abused. Few, if any, of the countless restaurants that serve
it daily, are aware of its history or can define it correctly or follow a
recipe that can be called 'authentic'.
So what is the history of the Biryani? Well, there are several versions but the most widely accepted states that it was born out of a fusion between the 'Pilaf' of Persian origin and the rice preparations indigenous to the subcontinent. The rice and meat combination was a big hit among the marching armies of the Mughal kings and was often used the feed the hungry troops when they camped at the end of the day during expeditions.
As is common with most dishes that are as celebrated as the Biryani, the recipe evolved over time and several different versions emerged in different parts of the country as the Mughal Empire expanded. However, over time, two dominant versions emerged in two cities that are now home to the remnants of a once thriving Muslim nobility and their refined culture - Lucknow and Hyderabad.
While the Lucknow version should actually be called 'Awadhi Gosht Pulao', the name 'Biryani' probably comes from the Hyderabadi version. While the ingredients in the two versions are, by and large, the same, there are differences in the method of preparation. The most important one is hidden in the fact that the Hyderabadi version is called 'Kachche Gosht Ki Biryani'. The mutton in the Hyderabadi Biryani is cooked on the charcoal flame along with the rice, while in the Lucknowi Pulao, the mutton is pre-cooked in a creamy stock called 'Yakhni', before the rice comes in.
Which version is better is a matter of great debate and I have absolutely no interest in taking sides. However, I feel the need to highlight a few things that set these two apart from any other combination of rice and meat that pretends to be a Biryani or a Pulao. Mutton or Beef is the meat to use and not Chicken. The Biryani/Pulao is cooked on a charcoal fire, preferably in a copper vessel using the 'Dum' technique. And random ingredients like potatoes and boiled eggs are never added.
While I will write about the Lucknowi Pulao in the future, this post will focus on the 'Hyderabadi Kachche Gosht Ki Biryani'. If you toss a stone in Hyderabad's old city, you will probably hit a restaurant claiming to serve the best Biryani. I wonder how many of them follow a recipe refined and perfected over generations by 'Khansamas' in the Nizam's kitchen.
I found that recipe by chance while watching a food-related show on television many years ago. The show featured Mehboob Alam Khan, a well-known expert on Hyderabadi cuisine, who spoke with great passion about the Biryani and even demonstrated how it's made. The episode left no doubt in my mind that the recipe, if followed religiously, would produce the closest approximation of the famed 'Nizamowali Hyderabadi Biryani'.
The copper vessel and the charcoal brazier ('Sigree') would take some finding though, and the plan to execute Mehboob Saheb's recipe remained a plan. My enthusiasm was revived however, when I found the video of that episode on YouTube recently and I set out to gather the equipment. That fact that you can find everything online these days helped and websites like Indiamart and TradeIndia helped me locate vendors for the Copper vessel and the Sigree.
Starting a charcoal flame in the Sigree took a few attempts, but once that was done, I was all set. The process started on a Sunday morning, with a visit to Janata Mutton Shop in Mahim. The butchers here know their cuts well and when I told the guy there that I wanted the meat to make Biryani, he promptly went to work on a fresh Lamb Leg. The meat on the leg is relatively tender and gives the best cuts for a Biryani.
While the marinade and the other prep was done in the kitchen at home, the charcoal fire had to be lit on the building roof. The whole thing from start to finish took about five hours and while I was nervous about a possible anti-climax (the meat not cooking enough or getting burnt at the bottom of the vessel), the fragrance escaping the 'Dum', told me this was working. And when the lid came off, the remaining doubt was laid to rest.
There was a lot of Biryani that day and many people ate it, including relatives who stay close by, and people at work the next day. The approval was unanimous and everyone agreed that it was special and completely different from restaurant Biryanis. A special thanks to Mr. Mehboob Alam Khan for sharing this work of art on TV. And for those you who could not taste it, here is the recipe. Follow it precisely and you'll know what I'm talking about.
Equipment
- Flat and wide copper vessel, tinned on the inside ("क़लई किया हुआ ताम्बे का बर्तन"). It is commonly called 'Lagan'. This is what it looks like.

Brass or Aluminum vessels can be used as well but the results won't be the same. Stainless steel is an absolute NO.
- Charcoal brazier, commonly called 'Sigree' in Hindi. This has two compartments, the upper one holds the charcoal and the lower one collects the ashes and also has a door to regulate the heat. A gas flame will not produce the same results.

Ingredients
1 kg Mutton (preferably the leg, cut into medium sized pieces)
3 tbsp. raw papaya paste
4 tbsp. ginger garlic paste
Salt, to taste
3 tbsp. turmeric powder
4 tbsp. red chili powder
1/2 stick cinnamon
10 cloves
10 cardamom pods (whole)
10-15 black peppercorns
5 tbsp. clarified butter (desi ghee)
4 medium sized onions (chopped lengthwise)
Juice of 1 lemon
4 tbsp. loose curd
4 green chilies, chopped
Chopped mint leaves
Chopped coriander leaves (divided into 2 portions)
3/4 kg long-grain Basmati rice
1 cup milk
15 strands of saffron
Wheat flour dough
Method
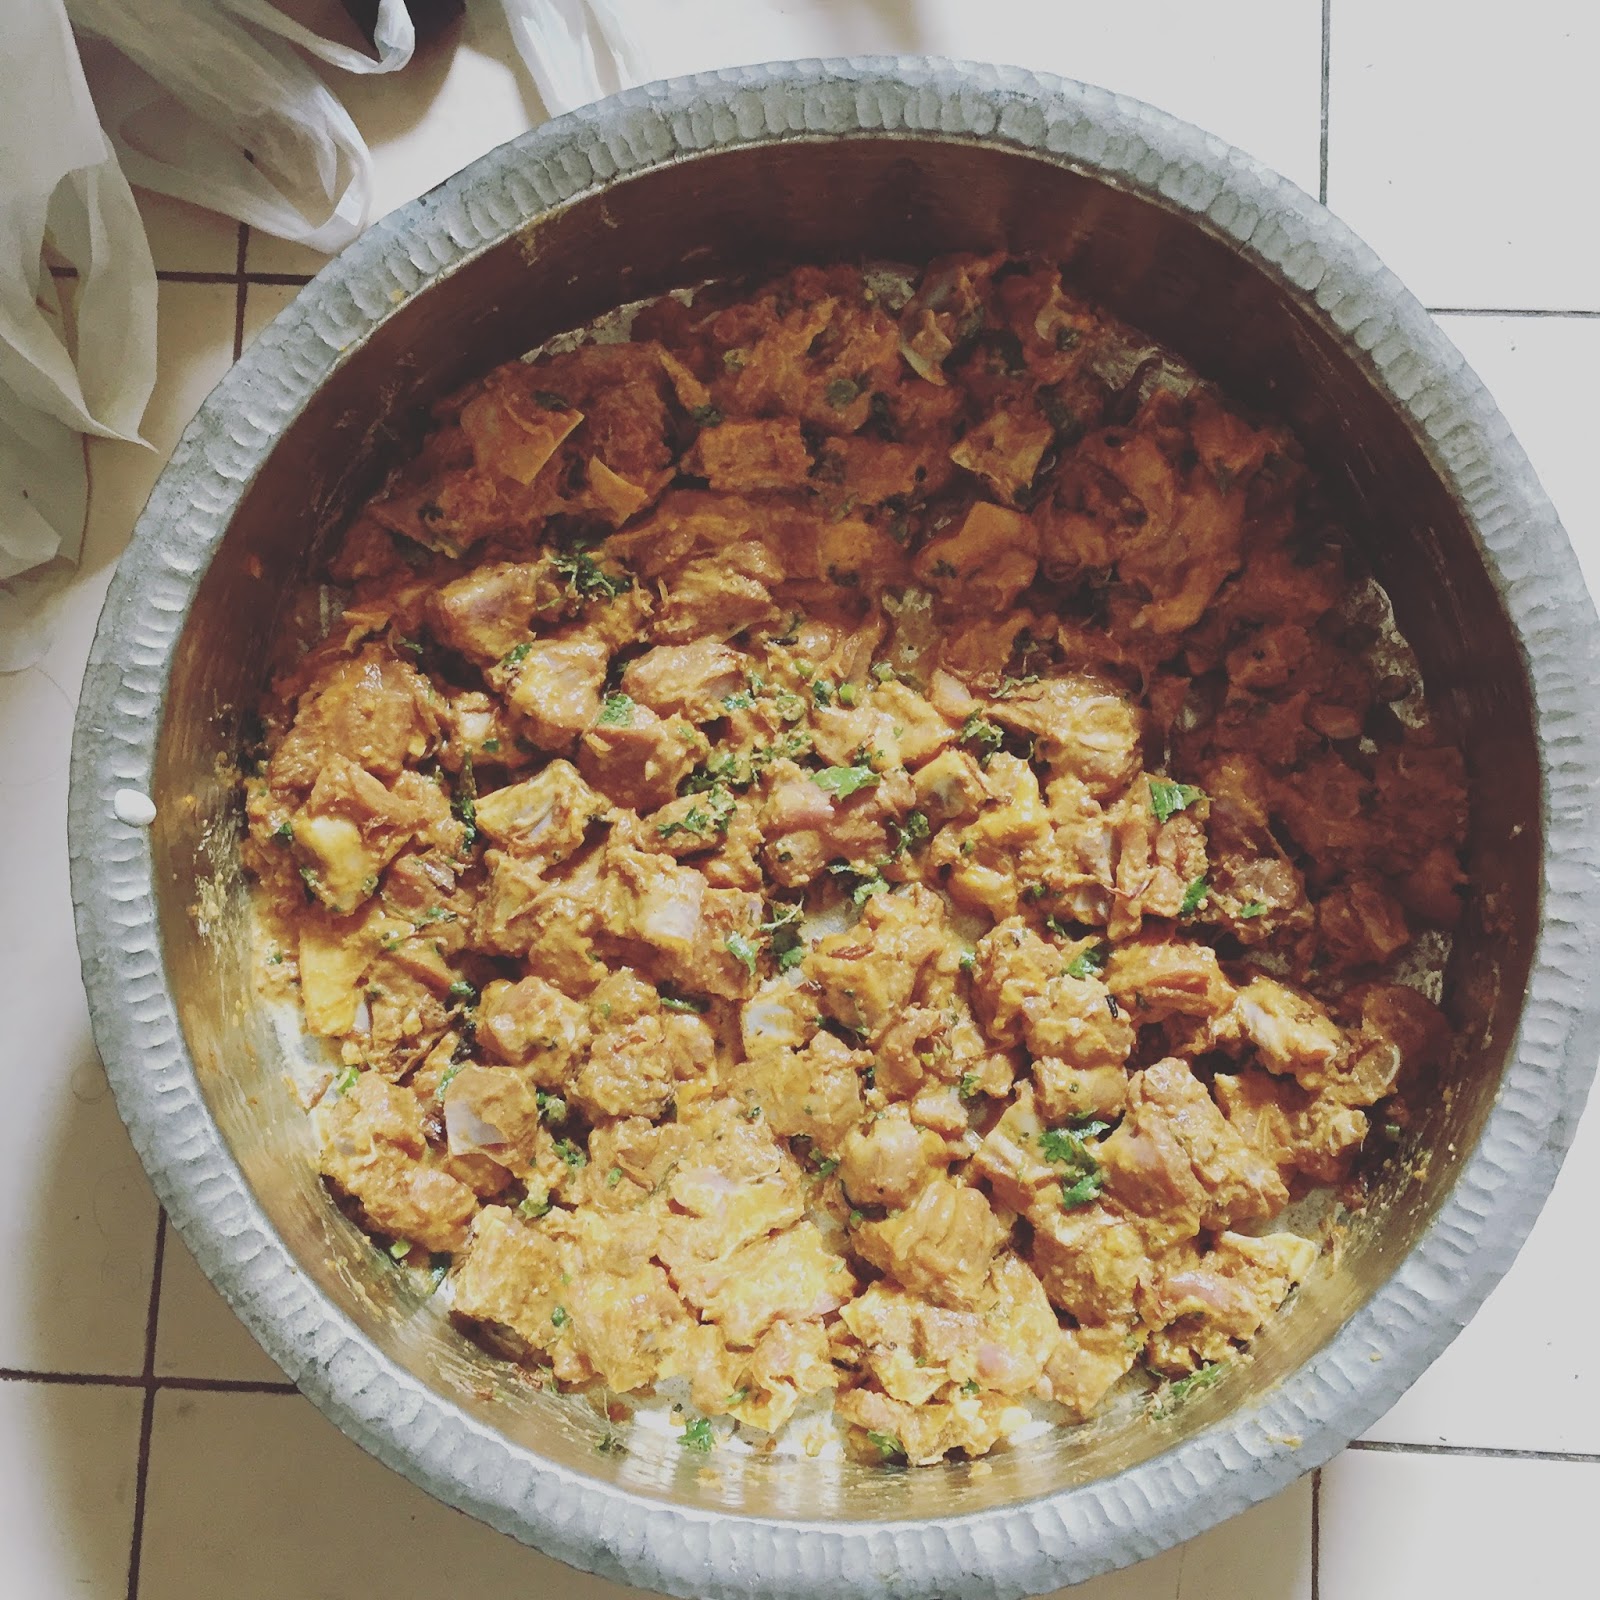
Heat the Ghee in a wok (Kadhai) and add the onions. Stir fry on medium heat till crisp, golden brown and caramelized. This should take around 15-20 minutes. Divide the fried onions into two portions and also the ghee used for frying. Wash the mutton pieces well and place them at the bottom of the copper vessel, ensuring that the bottom is more or less covered.

Add the papaya paste, ginger-garlic paste, salt, turmeric, red chili powder, crushed cinnamon, cloves, cardamom pods and peppercorns. Mix all of this thoroughly.

Add one portion of the fried onions, lemon juice, curd, green chilies and mint. Add half the chopped coriander leaves and half the ghee used for frying the onions. Mix all of this well and let it marinate for at least an hour.

Bring water to a boil in a large vessel. Add the rice and cook till about 60% done (the grain consistency should be 'al dente'). Drain the water but reserve a cup and add it to the ghee still left.
Add the saffron to a cup of milk and heat it on a low flame till it comes to a boil. Now, add the rice to the copper vessel, on top of the marinated mutton, covering the mutton fully and packing the layer lightly. Sprinkle this with the water and ghee mixture. Spread the saffron milk on top. Top this with the remaining fried onions and coriander. Line the rim of the copper vessel with the dough and place the lid on top.
Light the charcoal in the Sigree (there are a lot of articles online on how to do this). Once lit, place the sealed copper vessel on it. Place a heavy object (large stone or dumb-bell) on the lid. Leave the door at the bottom open for about 10 minutes and fan it with a cardboard sheet occasionally. This helps the flame build up. After 10 minutes, take the copper vessel down and use tongs to remove about 10-15 burning charcoal pieces from the Sigree and place them on the vessel lid. Add fresh charcoal pieces to the Sigree as replacement and put the vessel back. This time, shut the door to ensure a low, stable flame. Leave this set-up undisturbed for about 40-45 minutes.

After 45 minutes, take the vessel off the flame and remove the lid. Mix the contents well and serve as is, or with a few sides like mango pickle and Raita.

You'll get a better idea if you actually see how it's done, so here's the video as well.
Well I'm off to find a similarly awesome recipe for the Lucknowi version. So till I do, watch this space!
So what is the history of the Biryani? Well, there are several versions but the most widely accepted states that it was born out of a fusion between the 'Pilaf' of Persian origin and the rice preparations indigenous to the subcontinent. The rice and meat combination was a big hit among the marching armies of the Mughal kings and was often used the feed the hungry troops when they camped at the end of the day during expeditions.
As is common with most dishes that are as celebrated as the Biryani, the recipe evolved over time and several different versions emerged in different parts of the country as the Mughal Empire expanded. However, over time, two dominant versions emerged in two cities that are now home to the remnants of a once thriving Muslim nobility and their refined culture - Lucknow and Hyderabad.
While the Lucknow version should actually be called 'Awadhi Gosht Pulao', the name 'Biryani' probably comes from the Hyderabadi version. While the ingredients in the two versions are, by and large, the same, there are differences in the method of preparation. The most important one is hidden in the fact that the Hyderabadi version is called 'Kachche Gosht Ki Biryani'. The mutton in the Hyderabadi Biryani is cooked on the charcoal flame along with the rice, while in the Lucknowi Pulao, the mutton is pre-cooked in a creamy stock called 'Yakhni', before the rice comes in.
Which version is better is a matter of great debate and I have absolutely no interest in taking sides. However, I feel the need to highlight a few things that set these two apart from any other combination of rice and meat that pretends to be a Biryani or a Pulao. Mutton or Beef is the meat to use and not Chicken. The Biryani/Pulao is cooked on a charcoal fire, preferably in a copper vessel using the 'Dum' technique. And random ingredients like potatoes and boiled eggs are never added.
While I will write about the Lucknowi Pulao in the future, this post will focus on the 'Hyderabadi Kachche Gosht Ki Biryani'. If you toss a stone in Hyderabad's old city, you will probably hit a restaurant claiming to serve the best Biryani. I wonder how many of them follow a recipe refined and perfected over generations by 'Khansamas' in the Nizam's kitchen.
I found that recipe by chance while watching a food-related show on television many years ago. The show featured Mehboob Alam Khan, a well-known expert on Hyderabadi cuisine, who spoke with great passion about the Biryani and even demonstrated how it's made. The episode left no doubt in my mind that the recipe, if followed religiously, would produce the closest approximation of the famed 'Nizamowali Hyderabadi Biryani'.
The copper vessel and the charcoal brazier ('Sigree') would take some finding though, and the plan to execute Mehboob Saheb's recipe remained a plan. My enthusiasm was revived however, when I found the video of that episode on YouTube recently and I set out to gather the equipment. That fact that you can find everything online these days helped and websites like Indiamart and TradeIndia helped me locate vendors for the Copper vessel and the Sigree.
Starting a charcoal flame in the Sigree took a few attempts, but once that was done, I was all set. The process started on a Sunday morning, with a visit to Janata Mutton Shop in Mahim. The butchers here know their cuts well and when I told the guy there that I wanted the meat to make Biryani, he promptly went to work on a fresh Lamb Leg. The meat on the leg is relatively tender and gives the best cuts for a Biryani.
While the marinade and the other prep was done in the kitchen at home, the charcoal fire had to be lit on the building roof. The whole thing from start to finish took about five hours and while I was nervous about a possible anti-climax (the meat not cooking enough or getting burnt at the bottom of the vessel), the fragrance escaping the 'Dum', told me this was working. And when the lid came off, the remaining doubt was laid to rest.
There was a lot of Biryani that day and many people ate it, including relatives who stay close by, and people at work the next day. The approval was unanimous and everyone agreed that it was special and completely different from restaurant Biryanis. A special thanks to Mr. Mehboob Alam Khan for sharing this work of art on TV. And for those you who could not taste it, here is the recipe. Follow it precisely and you'll know what I'm talking about.
Equipment
- Flat and wide copper vessel, tinned on the inside ("क़लई किया हुआ ताम्बे का बर्तन"). It is commonly called 'Lagan'. This is what it looks like.

Brass or Aluminum vessels can be used as well but the results won't be the same. Stainless steel is an absolute NO.
- Charcoal brazier, commonly called 'Sigree' in Hindi. This has two compartments, the upper one holds the charcoal and the lower one collects the ashes and also has a door to regulate the heat. A gas flame will not produce the same results.

Ingredients
1 kg Mutton (preferably the leg, cut into medium sized pieces)
3 tbsp. raw papaya paste
4 tbsp. ginger garlic paste
Salt, to taste
3 tbsp. turmeric powder
4 tbsp. red chili powder
1/2 stick cinnamon
10 cloves
10 cardamom pods (whole)
10-15 black peppercorns
5 tbsp. clarified butter (desi ghee)
4 medium sized onions (chopped lengthwise)
Juice of 1 lemon
4 tbsp. loose curd
4 green chilies, chopped
Chopped mint leaves
Chopped coriander leaves (divided into 2 portions)
3/4 kg long-grain Basmati rice
1 cup milk
15 strands of saffron
Wheat flour dough
Method
Heat the Ghee in a wok (Kadhai) and add the onions. Stir fry on medium heat till crisp, golden brown and caramelized. This should take around 15-20 minutes. Divide the fried onions into two portions and also the ghee used for frying. Wash the mutton pieces well and place them at the bottom of the copper vessel, ensuring that the bottom is more or less covered.

Add the papaya paste, ginger-garlic paste, salt, turmeric, red chili powder, crushed cinnamon, cloves, cardamom pods and peppercorns. Mix all of this thoroughly.

Add one portion of the fried onions, lemon juice, curd, green chilies and mint. Add half the chopped coriander leaves and half the ghee used for frying the onions. Mix all of this well and let it marinate for at least an hour.
Bring water to a boil in a large vessel. Add the rice and cook till about 60% done (the grain consistency should be 'al dente'). Drain the water but reserve a cup and add it to the ghee still left.
Add the saffron to a cup of milk and heat it on a low flame till it comes to a boil. Now, add the rice to the copper vessel, on top of the marinated mutton, covering the mutton fully and packing the layer lightly. Sprinkle this with the water and ghee mixture. Spread the saffron milk on top. Top this with the remaining fried onions and coriander. Line the rim of the copper vessel with the dough and place the lid on top.
Light the charcoal in the Sigree (there are a lot of articles online on how to do this). Once lit, place the sealed copper vessel on it. Place a heavy object (large stone or dumb-bell) on the lid. Leave the door at the bottom open for about 10 minutes and fan it with a cardboard sheet occasionally. This helps the flame build up. After 10 minutes, take the copper vessel down and use tongs to remove about 10-15 burning charcoal pieces from the Sigree and place them on the vessel lid. Add fresh charcoal pieces to the Sigree as replacement and put the vessel back. This time, shut the door to ensure a low, stable flame. Leave this set-up undisturbed for about 40-45 minutes.

After 45 minutes, take the vessel off the flame and remove the lid. Mix the contents well and serve as is, or with a few sides like mango pickle and Raita.

You'll get a better idea if you actually see how it's done, so here's the video as well.
Well I'm off to find a similarly awesome recipe for the Lucknowi version. So till I do, watch this space!

2 comments:
Nicely written post.
What an excellent post!!
Post a Comment